Reading time: 5 minutes and 45 seconds.
Getting started
The getting started guide covers the aspects that are common to both mod types. When you have created a mod project and connected to it, continue to the articles with details specific to action mods or visualization mods. This guide describes the workflow for developing mods from Spotfire version 14.4 and later. In earlier Spotfire versions, where only visualization mods are available, the workflow is slightly different, see Getting started (before 14.4).
Prerequisites
-
A running instance of Spotfire with an open analysis file.
This is needed to develop and test a mod. Development can be done against the installed client or the web client using the Google Chrome web browser. -
Visual Studio Code.
The development experience is designed to integrate well with Microsoft Visual Studio Code (VS Code) by providing default build tasks, debug target, and IntelliSense. -
Node.js (version 22 or later) installed.
The development tooling requires Node.js version 22 LTS or later to be installed. In particular, to create mods and work with the development tooling, it must be possible to execute thenpmandnpxcommands.
Note: When you obtain third-party software or services, it is your responsibility to ensure you understand the license terms associated with such third-party software or services and comply with such terms.
Developing a mod
This section describes the basic steps for creating a mod using the Spotfire mods SDK.
1. Create a new project
Create an empty folder for the project and open the folder in VS Code.
Open a terminal and run the following commands to create a mod from the default template:
npx @spotfire/mods-sdk@latest new [action|visualization]
npm install
npm run build
Depending on the specified mod type (action or visualization) the corresponding VS Code project with some simple example code will be created.
💡 Note: You can add the --api-version <mods-api-version> when running the new command to target a specific version of the Mods API.
2. Start the local development server
Run the default build task, either by pressing “Ctrl + Shift + B” or by running the “Start watchers” task. This will launch three watchers:
- The TypeScript typechecker, which makes sure you are using the API in a type-safe manner.
- A build watcher, which automatically transforms the TypeScript files found in the
srcfolder into JavaScript files which are output in thebuildfolder. - The mods development server, which serves your project files to Spotfire during development. Your mod will be rebuilt when any TypeScript file is changed or when the mod manifest changes.
3. Connect Spotfire to the development server
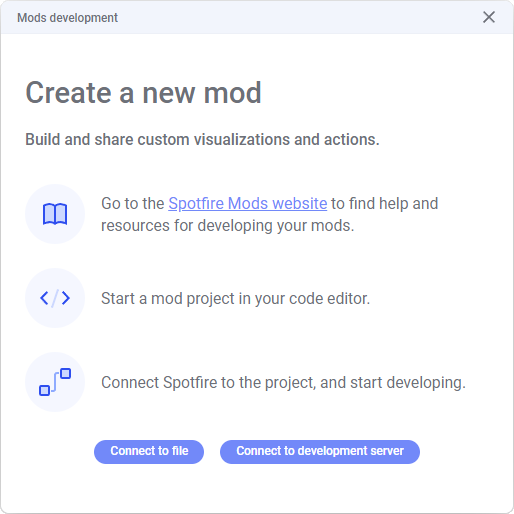
Open Spotfire and load some data. Go to Tools > Development > Mods development. This will open the Mods development tool.

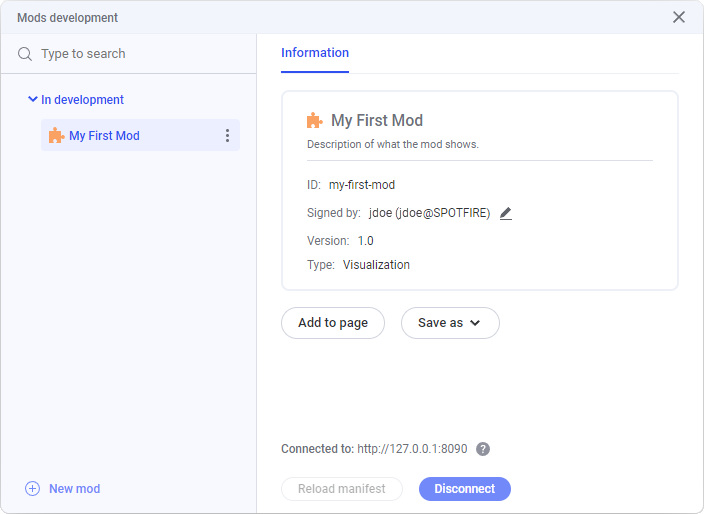
Click the Connect to development server button. In the pop-up that opens, make sure the port number (e.g. 8090) in the displayed URL matches the port number shown in VS Code, and then click the Connect button. This will make Spotfire load the mod from the local development server.
If the mod appears under In development in the sidebar to the left, it means that Spotfire has successfully connected to the development server.

Alternative workflows:
-
If the analysis already contains one or more mods, click New mod in the lower left corner of the Mods development tool to access the Connect to development server button.
-
If you only have access to the source code, not a valid VS Code project, it is still possible to load this into Spotfire. Click the Connect to file button and browse to the mod-manifest.json file of the project. This option is only available in the installed client, and the developer experience will be limited.
4. Developing the mod
When updating and saving the source file, the build watcher will automatically rebuild the mod. The mods development server will then, when connected, send the new mod content to Spotfire for automatic update.
All metadata that concerns the mod is defined in the mod-manifest.json file. Below is a list of the entries that are common to all mods. Each mod type also has some specific entries that you can read more about in Developing action mods and Developing visualization mods.
| Entry | Description |
|---|---|
| id | The id of the mod. Note that this must be unique. |
| type | Specifies the type of mod, action or visualization. This is available from apiVersion 2.0. |
| apiVersion | The api version requested. This will affect which Spotfire versions the mod will work on. |
| name | The name of the mod. |
| description | A description of the mod. This is available from apiVersion 2.0. |
| version | The version of the mod. |
| icon | File path to the embedded icon, which is used in various places in the Spotfire UI. |
| files | An array of all files that should be bundled in the mod. Only files specified here will be embedded by Spotfire. |
Changes to the mod manifest are not automatically sent to Spotfire like the content. Whenever the manifest is updated, you must click the Reload manifest button.
Depending on the type of the connected mod, the actual workflow of developing and testing the mod is different. See Developing action mods and Developing visualization mods for details.
5. Disconnecting
When you are done developing a mod, click Disconnect to exit the development workflow. This will force a synchronization of the local files to Spotfire, and unlock save options. The mod is now embedded in the analysis.
Saving to the library
When a mod is embedded in the analysis (disconnected), you can share it with others by saving it to the library. In the Mods development tool, you can right-click a mod in the sidebar and select Save as library item from the menu. It is also possible to save a visualization mod from the Visualization types flyout, and an action mod from the Actions flyout.
Sharing mods
When sharing a final version of the mod to end users, you might want to consider the form in which the mod is shared. Code minification and obfuscation should be considered in such cases, because it will:
- Minimize the footprint of the mod, as minimized code is much more compact, making the mod file smaller.
- Protect the intellectual property. Minimized and obfuscated code is harder to read and understand.
To minimize and obfuscate the code, run the following commands:
npm run buildThis will build the mod once in a minimized and obfuscated form.npm run server
You can now connect to the mods development server just like described above.
To learn more about how the trust framework for mods works when used in a Spotfire Server environment, see Trusting custom content in the Spotfire environment.
When building mods to be shared between different environments, it is recommended to sign the mods using a certificate from a trusted certificate authority (CA). See Signing a mod using Package Builder for more information. Spotfire Package Builder is available in the SDK folder of the Spotfire Developer software, which can be downloaded from the Spotfire Download site, if you have access.
An administrator can also import a certificate from one system to another to keep signed items valid. See Moving certificates from one system to another for more information.